![]()
![]()
If you have Microsoft Office 2003 or XP installed, then Outlook is probably also installed. For Outlook Express, go here. If this is for a desktop PC in the Mathematics Department, this should already be setup for you. If not, contact the
| 1. |  It's best to open the Mail Settings from the Control Panel. It's best to open the Mail Settings from the Control Panel. |
| 2. |  The Mail Setup window appears. Click on the "E-mail Accounts..." button. The Mail Setup window appears. Click on the "E-mail Accounts..." button. |
| 3. |  The E-mail Accounts window appears. Make
sure the "View or Change existing e-mail accounts" is selected and click on the "Next >" button. The E-mail Accounts window appears. Make
sure the "View or Change existing e-mail accounts" is selected and click on the "Next >" button. |
| 4. |  If you see the Math IMAP account listed
like in the picture, then an account is already setup, but you may want to check to see that it is setup for your account. In any case,
click on the "Change..." button. If you see the Math IMAP account listed
like in the picture, then an account is already setup, but you may want to check to see that it is setup for your account. In any case,
click on the "Change..." button. |
| 5. |  If you are setting up a new account, you'll see a Server Type
window. It is recommended that you select IMAP, however you can choose POP instead. Read this for an explanation of
Server Types and why you should choose IMAP. If you are setting up a new account, you'll see a Server Type
window. It is recommended that you select IMAP, however you can choose POP instead. Read this for an explanation of
Server Types and why you should choose IMAP. |
| 6. | 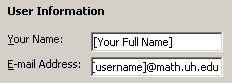 Fill in your Full name and e-mail address
in the Logon Information. Fill in your Full name and e-mail address
in the Logon Information. |
| 7. | 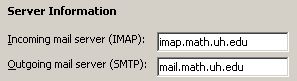 Fill in the Server Information using the information from the
main email settings page here. Fill in the Server Information using the information from the
main email settings page here. |
| 8. | 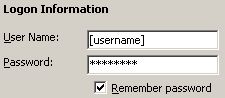 Fill in the User Information with your username and password. If
you leave the "Remember password" enable, then you won't have to type in your password each time you access the e-mail server. Fill in the User Information with your username and password. If
you leave the "Remember password" enable, then you won't have to type in your password each time you access the e-mail server. |
| 9. | Click on the |
| 10. | 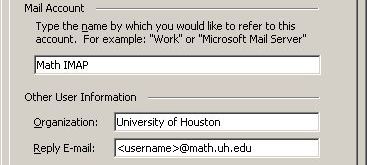 You should change the name of the account to something more descriptive,
such as Math IMAP. In the Organization box, put University of Houston. For E-mail address you should put your Math e-maill
address if you want the recipients to see that, or you can make it some other e-mail address. The Reply address box, is where you want
replies to the e-mails you send from this computer to be sent. This does not have to be your Math e-mail account, but it is usually
a good idea to make it that anyway. You should change the name of the account to something more descriptive,
such as Math IMAP. In the Organization box, put University of Houston. For E-mail address you should put your Math e-maill
address if you want the recipients to see that, or you can make it some other e-mail address. The Reply address box, is where you want
replies to the e-mails you send from this computer to be sent. This does not have to be your Math e-mail account, but it is usually
a good idea to make it that anyway. |
| 11. | If you are setting up Outlook for use only within the department, you are done. |
| The following settings are only required if setting up Oulook for use outside of the Math Department. | |
| 12. | 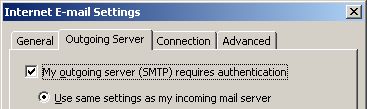 Click on the "Outgoing" tab. Enable the "My outgoing server (SMTP)
requires authentication" and make sure "Use same settings as my incoming mail server" is selected. Click on the "Outgoing" tab. Enable the "My outgoing server (SMTP)
requires authentication" and make sure "Use same settings as my incoming mail server" is selected. |
| 13. | 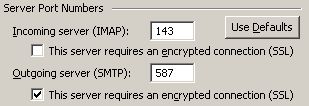 Click on the "Advanced" tab. For the Incoming server,
change the type of encrypted connection to Auto. The Port number should stay at 143, if not make sure it is set to 143. For the Outgoing server,
change the type of encrypted connection to TLS and then change the port number from 25 to 587. Click on the "Advanced" tab. For the Incoming server,
change the type of encrypted connection to Auto. The Port number should stay at 143, if not make sure it is set to 143. For the Outgoing server,
change the type of encrypted connection to TLS and then change the port number from 25 to 587. |
| 14. | |
| 15. | Click "Ok" and "OK" again. Outlook should now be able to access your account. |
Although you can send and receive emails using Outlook, to function properly, Outlook needs more configuration. Click here to continue.
![]()